
Would you like to save this?
If you want to make the best ham on the Big Green Egg, follow along with this easy recipe for double smoked ham perfection on the Big Green Egg. Note: This post is a part of GrillGirl’s Big Green Egg Series, a deep dive into the popular Kamado style grill and all that it offers. Follow along on this adventure if you have ever been curious about getting an Egg or want to better understand how to get the most out of your Egg.
A ham on the grill is a great way to bring an amazing meal to a group of family and friends. It’s a fairly straight forward cook that you can do with minimal effort. Let’s spend a few minutes talking about the types of hams, just how you should go about selecting and preparing that perfect ham on your Big Green Egg. So before we get into the cook let’s talk a little ham. Feel free to skip over this and scroll right down to the cook if you want to jump right into it.

First off, what is ham? What is a City Ham vs a Country Ham and the Best Ham to Buy for the Money
Ham starts off as a pork cut from the rear leg that has been preserved by wet or dry curing with or without smoke. Before this curing/smoking process the cut is referred to as a fresh or green ham. This fresh ham is like any other pork roast you may encounter. It doesn’t taste like the ham we know until some type of curing takes place.
There are two general ways to cure a ham. A dry cure and a wet cure. Dry cured hams are referred to as country hams. The are cured with a dry rub, They can be smoked or unsmoked then hung to dry and sold uncooked. Country hams have a drier texture and an intense salty flavor.
Wet cured hams are referred to as city hams. City hams have been cured with a wet brine or injection of saline solution, sometimes smoked and sold fully cooked. City hams have much more moisture, texture, and mild flavor.
The ham you generally see in the supermarket for the holidays are mainly city hams. That’s what we will be cooking today. When it comes to city hams we have a few options so let’s explore these.
Hams can be sold whole or in halves. The top half of a ham is known as the butt end. The lower half is known as the shank end. The butt end ends to be very tender and may contain a portion of the hip bone which can make carving a bit more difficult. If a ham is labeled semi-boneless this hip bone has been removed. The shank or lower end can be easier to carve. The lower muscles work harder than the uppers so the shank end can be slightly tougher than the butt end. The shank also contains a higher fat content. It’s easy to tell the butt from the shank as the butt end is shaped much like a half circle while the shank end tends to be more cone shaped. You will also find boneless hams. Boneless hams are certainly easy to prepare and slice. Often they aren’t actually whole hams but ham pieces formed together.
When shopping for your ham take a look at the label. City hams come with various amounts of water added to them after the brining process. This added water does in fact impact the flavor of the ham. Here’s a quick look at what you’ll see on the label and exactly what it means:
“Ham or NO WATER ADD” indicates a cured pork leg that is at least 20.5% protein with no added water. This is thought to be the best tasting city hams.
“Ham with natural juices” is the next level down. It needs to be only 18.5% protein, and generally has about 7 or 8% added water. We are unable to determine exactly what natural juices consist of but this verity is considered the second best option for ham.
“Ham, water added” must contain at least 17% protein, and can contain at most 10% added water by weight. You will find this category of ham the lowest cost of the three as it has a significant amount or water added..

How Much Ham Should I Buy for Smoking a Ham on my Big Green Egg?
Let me give you a starting point for how much ham you need. For boneless ham consider buying ½ pounds per person if you don’t think they are going to want a second helping. Go with ¾ pounds per person for a bone in. Or you can do what I do and go with a full on 1 pound per person with ether bone in or boneless. You can always send some home with your guest or enjoy the leftover ham in so many ways.
One more thing I’d like to mention is picnic ham. You will more than likely see this at the market from time to time. This is what they are. A picnic ham comes from the front leg not the rear. Call it the forearm of the pig if you will. While this is not truly a ham it will taste like ham because of the curing process. These picnics are smaller than other hams and tend to be a bit tougher than hams as the front legs of a pig do work harder than the rear.
Ingredients for Ham on the Big Green Egg
- 1 8-pound semi boneless smoked ham (I recommend Snake River Farms Kurobuta Hams for special occasions!)
Glaze Ingredients:
- 1 20 oz. can crushed pineapple (include the juice)
- 2/3 cup honey
- 1 tbsp. fresh grated ginger
- 1 cup pineapple preserves (I used Melinda’s Pineapple Preserves)
- 1/4 cup rice wine vinegar
- 2 tbsp rum
Alright already! Let’s Smoke A Ham on the Big Green Egg!
Now that you have your fully cooked city ham back at home it’s time to start talking about how to get that ham on the Big Green Egg and ready for the guests. Most grocery store city hams are pre cooked so we just need to reheat it, perhaps add just a touch more smoke and give it a simple glaze to really make that ham a star. Check the label and be sure your ham is indeed fully cooked.

Let’s review the reheating steps and we can talk glaze in just a few minutes. We will be doing this ham with an indirect cooking method so get your Egg fired up and add a few wood chunks to your coals if you like. Any type woods will do so use your favorite. Peach, Pecan, Apple, Cherry, Oak. If you choose to go with Hickory use it sparingly. It can be a tad bit strong at times. Drop in the convEGGtor and get the Egg running 225°-250°F. If you need a quick refresher on getting your egg up and running take a look at the ” How to Lay a Fire and Control the Temp on your Big Green Egg” write up.

Place a drip pan on the convEGGtor and get the ham on the cooking grate. A good rule of thumb at this temperature range will be 12-15 minutes per pound. Now that the ham is on the egg let’s talk about the glaze.
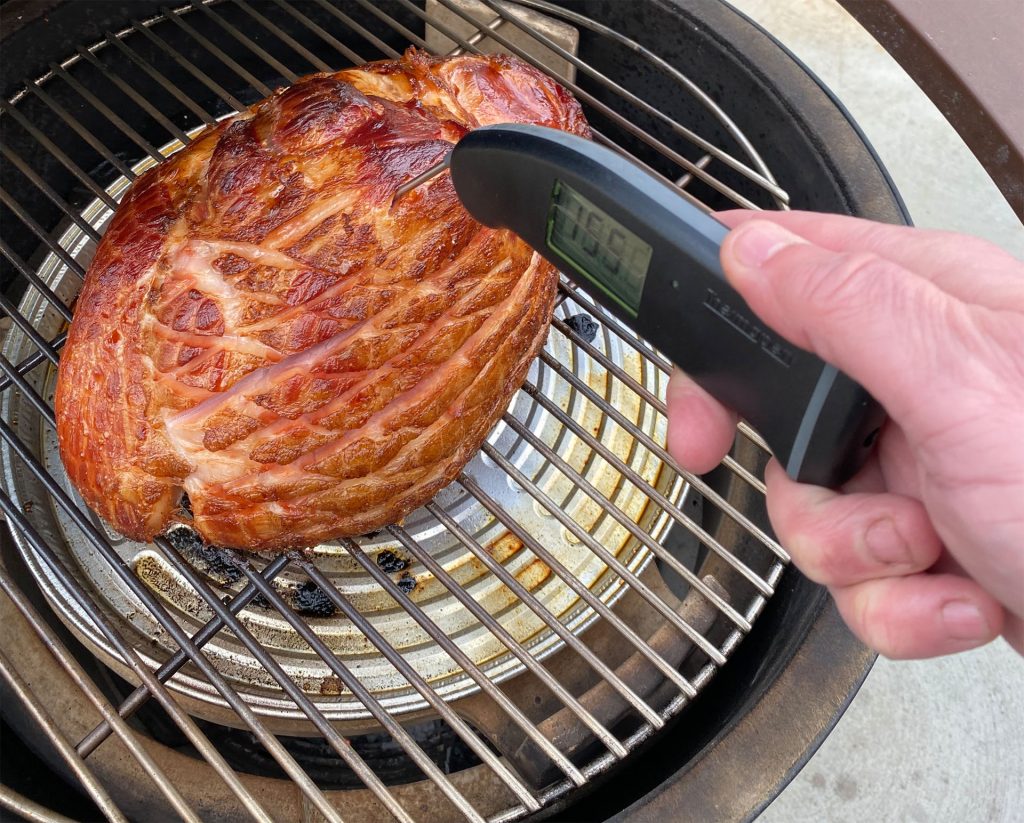
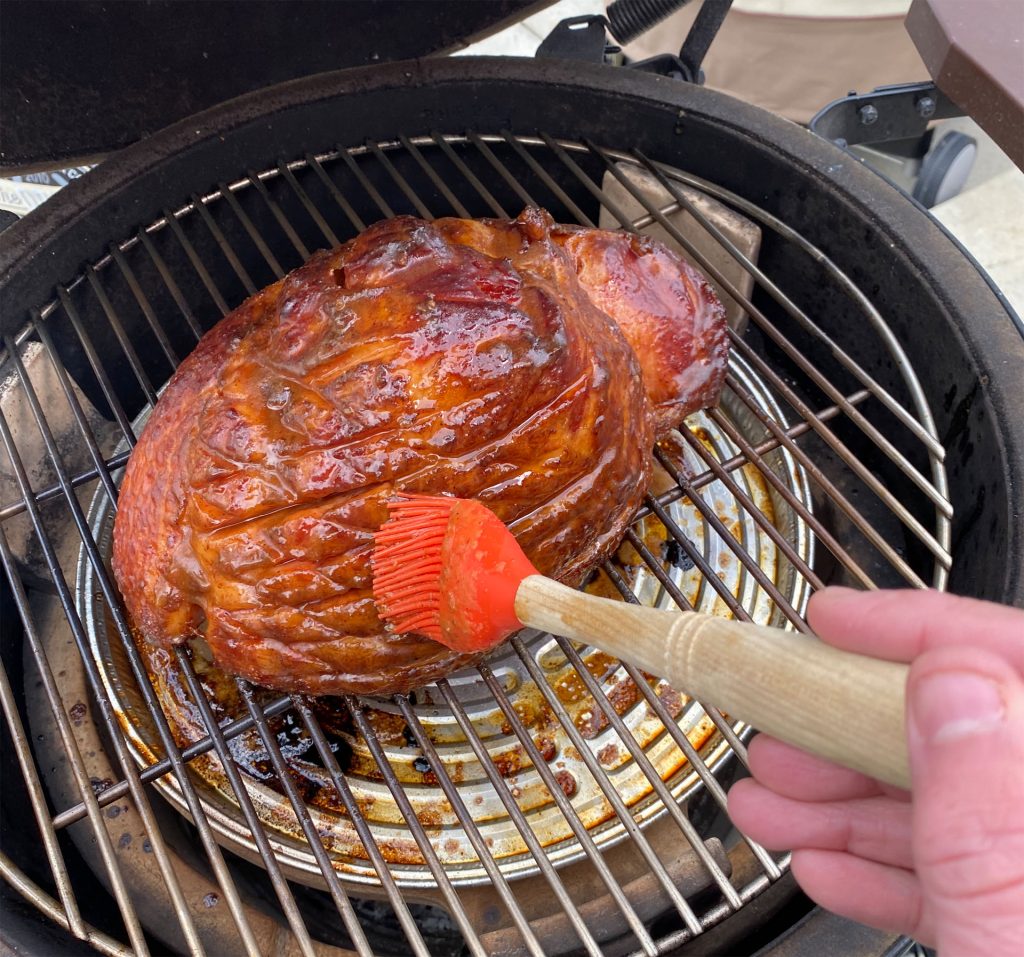
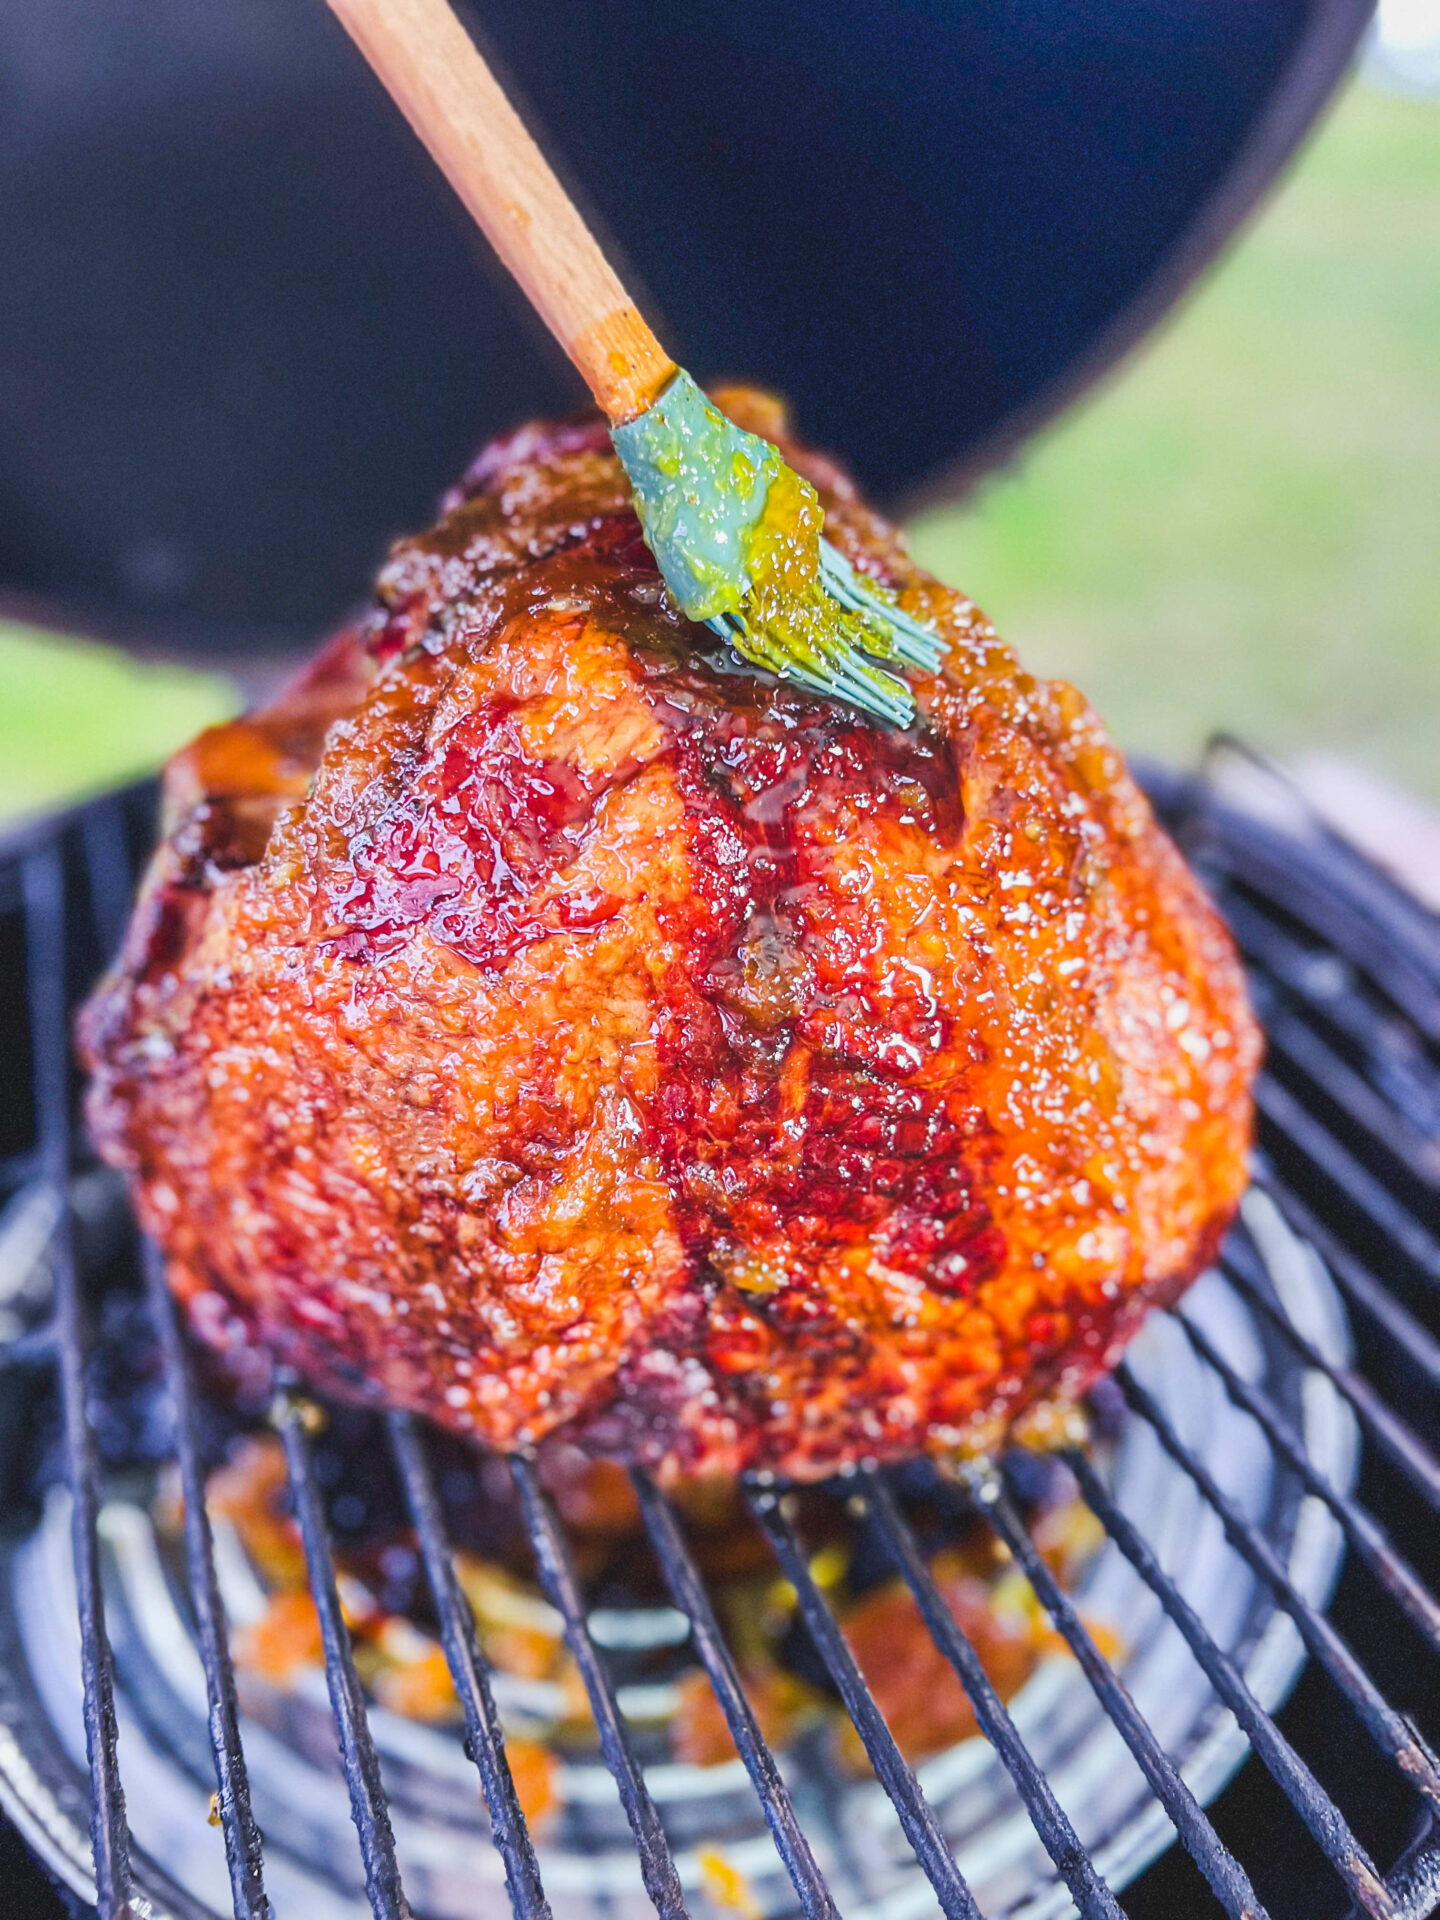
When the ham reaches an internal temperature of 130°, checked with a good instant read thermometer such as the Thermapen or ThermoPop by ThermoWorks, start applying your glaze. Re-glaze every 15 min or so until your ham reaches an internal temperature of 140°f.
Remove your ham and let it rest 15-20 minute. If your ham is done before you’re ready to serve, set it in a foil pan. Cover with aluminum foil and place it in a clean dry cooler until ready to serve. When it’s time get that ham sliced up and served to your guests.

Ham is an easy and impressive dish. It can be served warm or at room temperature. Ham pairs well with so many side dishes and can be served breakfast, lunch or dinner. A ham on the Big Green Egg is a crowd pleaser for sure. Now go get yourself a ham and get it on that BGE!
If you are looking for more Ham Inspiration, check out our Bourbon Fig Glazed Smoked Ham Recipe for more Ham inspiration!
I’d love the hear your tips and tricks for ham on the grill. Please share them in the comments below.
Thank you so much for reading. Till next time happy grilling- ~ Jon Solberg, Egg Contributor for GRILLGIRL.COm
Double Smoked Ham with Pineapple Ginger Glaze on the Big Green Egg
Ingredients
- 1 8- pound semi boneless smoked ham
Glaze Ingredients:
- 1 20 oz. can crushed pineapple don't drain the liquid!
- ⅔ cup honey
- 1 tbsp. fresh grated ginger
- 1 cup pineapple preserves
- ¼ cup rice wine vinegar
Instructions
- Prepare your Big Green Egg for smoking, using your convEggtor, getting it to a temp of 225-250 degrees.
- Add cherry or apple wood chips to the fire to create additional smoke.
- Place the ham, flat side down, on the indirect side of the grill, letting it grill until the internal temperature reaches 145 degrees with an internal read thermometer; this should take about an hour and a half for an 8-pound ham.
- After you have placed the ham on the grill, make your glaze. Combine the crushed pineapple, honey and ginger in a saucepan and bring to a simmer. Let the pineapple glaze simmer on medium low for about 20 minutes to combine and reduce down the glaze.
- Once the ham has reached an internal temperature of 135 degrees, go ahead and add half of the glaze to the ham via a basting brush or spoon.
- When the ham has reached an internal temperature of 145 degrees, remove the ham from the grill.
- Slice the ham and serve with additional glaze.
Notes
Back to our Big Green Egg Series
Want more pork inspiration? Check out our PORK RECIPES!
It’s Mouthwatering.